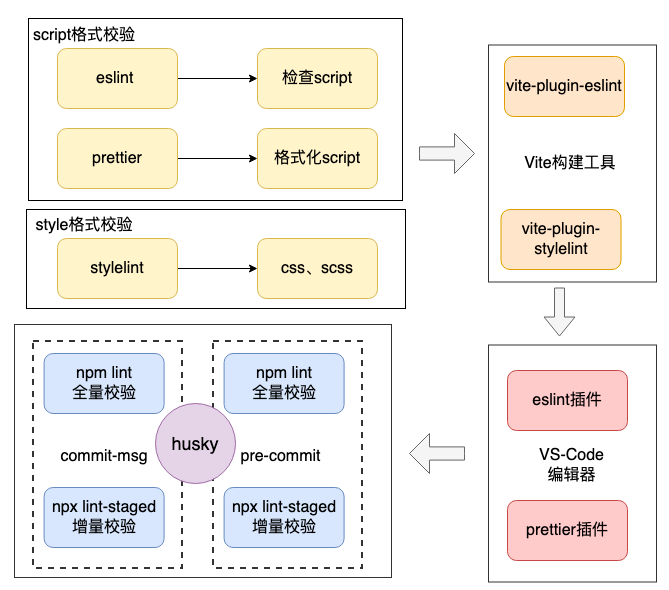
使用lint工具链保证团队的代码质量
现代前端项目一般都是团队配合了,为了项目更好地维护,需要团队成员保持一致的编码风格。 随着前端技术的不断演进,业界涌现了诸多的工具链,来帮助我们提高团队的代码质量。 这其中以 lint 类的工具链,在前端工程中的普及,最为代表性。 几乎所有的前端工程中都会用到 ESlint 了。 本文总结一下有关前端项目中,如何搭配 lint 类(eslint、stylelint、lint-staged 等)的工具链,让代码编写更加规范。
vite脚手架创建工程
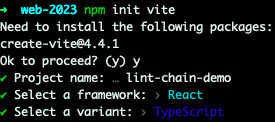
我们首先用 vite 的脚手架快速创建一个项目工程。
npm init vitenpm init vite我们这里选择 创建一个 react + typescript 的模板工程。
进入我们选定的目录,脚手架帮我们创建好了初始工程
.
├── README.md
├── index.html
├── node_modules
├── package-lock.json
├── package.json
├── public
├── src
├── tsconfig.json
├── tsconfig.node.json
└── vite.config.ts
.
├── README.md
├── index.html
├── node_modules
├── package-lock.json
├── package.json
├── public
├── src
├── tsconfig.json
├── tsconfig.node.json
└── vite.config.ts安装依赖,执行命令 npm run dev,就能顺利跑起来一个前端项目,在浏览器其中打开 http://localhost:5174/。

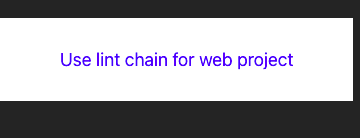
我们先安装一下 sass,然后写一个简单的 Info 组件:
import './info.scss';

const Info = () => {
  return (
    <section className="info-box">
      <p>Use lint chain for web project</p>
    </section>
  );
};

export default Info;
import './info.scss';
const Info = () => {
return (
<section className="info-box">
<p>Use lint chain for web project</p>
</section>
);
};
export default Info;info.scss 代码如下:
.info-box {
  padding: 10px 30px;
  margin: 0 auto;
  color: blue;
  background-color: #fff;
}
.info-box {
padding: 10px 30px;
margin: 0 auto;
color: blue;
background-color: #fff;
}在 App.tsx 中引入一下:
import Info from './components/Info';

function App() {
  return (
    <>
      <Info />
    </>
  );
}

export default App;
import Info from './components/Info';
function App() {
return (
<>
<Info />
</>
);
}
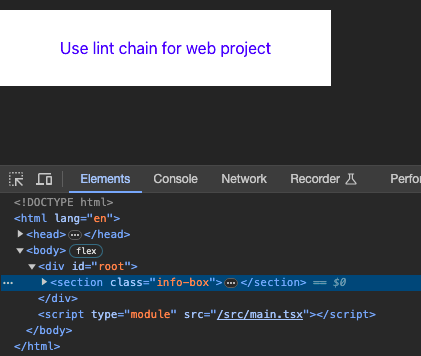
export default App;保存后,浏览器自动刷新:
使用 eslint
脚手架创建好的工程中,已经内置了 ESlint。 我们可以根据自身的需求,修改其中的配置,来符合团队的规范。
这里我们先保持不动,接下来引入 prettier
(可选)使用prettier
prettier 是一款代码风格的格式化工具,和 eslint 有些功能是重合的。 在日常的项目开发中,一般会选择让 eslint 来做代码的语法 和 格式检查。 而让 prettier 来做代码风格的格式化工作,毕竟 prettier 在格式化方面功能更强大。
我们安装 prettier的相关模块:
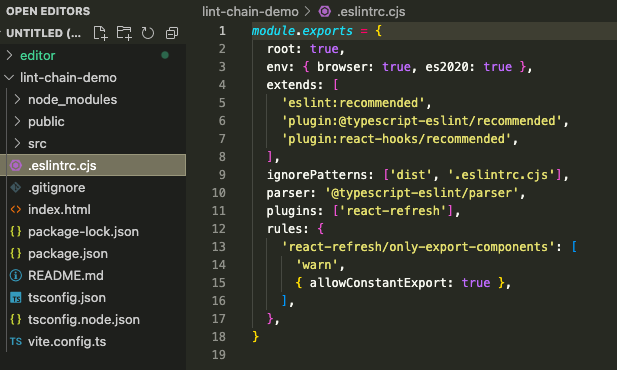
npm install -D prettier eslint-config-prettier eslint-plugin-prettiernpm install -D prettier eslint-config-prettier eslint-plugin-prettier打开 eslint 的配置文件:.eslintrc.cjs
这里由于package.json文件中 type已经设置成 module,默认项目支持ES-Module的规范,所以这里我们引入的 eslint 的配置文件,使用 .csj 的后缀告诉 vite 这是一个 commonJS 规范的配置文件。
module.exports = {
  root: true,
  env: { browser: true, es2020: true },
  extends: [
    'eslint:recommended',
    'plugin:@typescript-eslint/recommended',
    'plugin:react-hooks/recommended',
    // 增加下面两句:引入 prettier 规则
    'prettier',
    'plugin:prettier/recommended'
  ],
  ignorePatterns: ['dist', '.eslintrc.cjs'],
  parser: '@typescript-eslint/parser',
  // 加入 prettier 插件
  plugins: ['react-refresh', 'prettier'],
  rules: {
    'react-refresh/only-export-components': [
      'warn',
      { allowConstantExport: true },
    ],
    // 增加下面的配置,让 prettier 自动修复代码问题
    'prettier/prettier': 'error',
    quotes: ["error", 'single'],
    semi: ["error", 'always'],
    "react/react-in-jsx-scope": "off"
  },
}module.exports = {
root: true,
env: { browser: true, es2020: true },
extends: [
'eslint:recommended',
'plugin:@typescript-eslint/recommended',
'plugin:react-hooks/recommended',
// 增加下面两句:引入 prettier 规则
'prettier',
'plugin:prettier/recommended'
],
ignorePatterns: ['dist', '.eslintrc.cjs'],
parser: '@typescript-eslint/parser',
// 加入 prettier 插件
plugins: ['react-refresh', 'prettier'],
rules: {
'react-refresh/only-export-components': [
'warn',
{ allowConstantExport: true },
],
// 增加下面的配置,让 prettier 自动修复代码问题
'prettier/prettier': 'error',
quotes: ["error", 'single'],
semi: ["error", 'always'],
"react/react-in-jsx-scope": "off"
},
}我们一般也会单独创建一个 prettier 的配置文件:.prettierrc.cjs
// .prettierrc.js
module.exports = {
  printWidth: 120, //一行的字符数,如果超过会进行换行,默认为80
  tabWidth: 2, // 一个 tab 代表几个空格数,默认为 2 个
  useTabs: false, //是否使用 tab 进行缩进,默认为false,表示用空格进行缩减
  singleQuote: true, // 字符串是否使用单引号,默认为 false,使用双引号
  semi: true, // 行尾是否使用分号,默认为true
  trailingComma: "none", // 是否使用尾逗号
  bracketSpacing: true // 对象大括号直接是否有空格,默认为 true,效果:{ a: 1 }
};
// .prettierrc.js
module.exports = {
printWidth: 120, //一行的字符数,如果超过会进行换行,默认为80
tabWidth: 2, // 一个 tab 代表几个空格数,默认为 2 个
useTabs: false, //是否使用 tab 进行缩进,默认为false,表示用空格进行缩减
singleQuote: true, // 字符串是否使用单引号,默认为 false,使用双引号
semi: true, // 行尾是否使用分号,默认为true
trailingComma: "none", // 是否使用尾逗号
bracketSpacing: true // 对象大括号直接是否有空格,默认为 true,效果:{ a: 1 }
};在 package.json 文件中,已经有 eslint的配置了,我们这里先把它修改一下( lint => lint:script ),以便于和下面介绍的 style 的校验做区分
"scripts": {
  // 省略 其它配置......
  "lint:script": "eslint --fix . --ext ts,tsx --report-unused-disable-directives --max-warnings 0",
}"scripts": {
// 省略 其它配置......
"lint:script": "eslint --fix . --ext ts,tsx --report-unused-disable-directives --max-warnings 0",
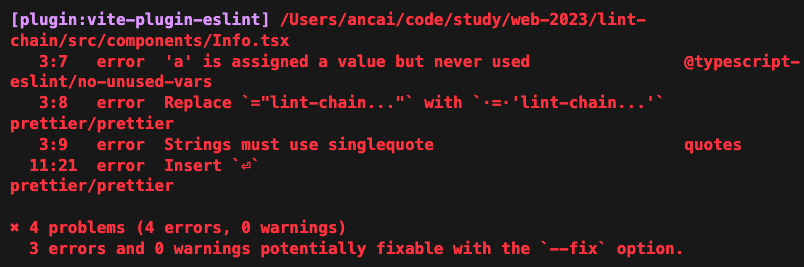
}在命令行执行 npm run lint:,如果代码中有语法或风格问题,就会在控制台报错。 这里我们人为添加一句无用的代码来做测试。
const a = 1; // 增加一个未使用的变量 a
const Info = () => {
  return (
    <section className="info-box">
      <p>Use lint chain for web project</p>
    </section>
  );
};
export default Info;
const a = 1; // 增加一个未使用的变量 a
const Info = () => {
return (
<section className="info-box">
<p>Use lint chain for web project</p>
</section>
);
};
export default Info;此时,会看到下面的报错:

说明 eslint + prettier 的配置已经生效了。 接下来我们配置 样式风格的校验:styellint。
使用 stylelint
stylelint 是一款 CSS 样式代码的风格校验工具,和 eslint 处理 JavaScript、Typescript、CoffeeScript等定位一样。 它不仅支持 CSS,通过插件一样可以处理 Sass、less 等。 我们安装相关的 node 模块库:
npm install -D stylelint stylelint-config-standard stylelint-config-standard-scss stylelint-config-recess-ordernpm install -D stylelint stylelint-config-standard stylelint-config-standard-scss stylelint-config-recess-order- stylelint-config-standard : stylelint中的标准规范中定义的规则
- stylelint-config-standard-scss : 对 Sass 预处理的支持
- stylelint-config-recess-order : 约束样式的属性顺序
- 创建一个 stylelint的配置文件(stylelint也有自动生成的命令:npm init stylelint )
.stylelintrc.json
{
  // 定义继承的规则集
  "extends": ["stylelint-config-standard", "stylelint-config-standard-scss", "stylelint-config-recess-order"],
  // 根据项目需求,自定义设置规则
  "rules": {
    "block-no-empty": null,
    "unit-allowed-list": ["em", "rem", "%", "s", "px", "vw", "vh", "ms", "deg"],
    "alpha-value-notation": ["percentage", { "exceptProperties": ["opacity"] }]
  }
}
{
// 定义继承的规则集
"extends": ["stylelint-config-standard", "stylelint-config-standard-scss", "stylelint-config-recess-order"],
// 根据项目需求,自定义设置规则
"rules": {
"block-no-empty": null,
"unit-allowed-list": ["em", "rem", "%", "s", "px", "vw", "vh", "ms", "deg"],
"alpha-value-notation": ["percentage", { "exceptProperties": ["opacity"] }]
}
}- 在 package.json 文件中,配置对样式文件的校验支持:
"scripts": {
  // 省略其他配置
  "lint:style": "stylelint --fix \"src/**/*.{css,scss}\"",
},"scripts": {
// 省略其他配置
"lint:style": "stylelint --fix \"src/**/*.{css,scss}\"",
},我们在 info.css 文件中多写一点儿样式代码,故意弄出一点儿风格问题
.info-box {
  width: 100%;
  background-color: #fff;
  padding: 10px 30px 10px 30px;
  margin: 0 auto;
  // theme color
  color: blue;
  text-align: center;
  p {
    font-size: 18px;
  }
}
.info-box {
width: 100%;
background-color: #fff;
padding: 10px 30px 10px 30px;
margin: 0 auto;
// theme color
color: blue;
text-align: center;
p {
font-size: 18px;
}
}在命令行执行 npm run lint:style后,会悄无声息地帮我改成下面更符合规范的样式代码
.info-box {
  width: 100%;
  padding: 10px 30px;
  margin: 0 auto;

  // theme color
  color: blue;
  text-align: center;
  background-color: #fff;

  p {
    font-size: 18px;
  }
}
.info-box {
width: 100%;
padding: 10px 30px;
margin: 0 auto;
// theme color
color: blue;
text-align: center;
background-color: #fff;
p {
font-size: 18px;
}
}- 增加了两处空行:p选择器的前面 和 注释行的前面
- 样式属性简写:padding: 10px 30px 10px 30px; => padding: 10px 30px;
- 调整属性的顺序:background-color属性移动到了最后面
这样我们就初步配置了,对脚本代码 和 样式代码的语法风格校验了。 但是,我们也能发现,每次都在命令执行 npm run lint:script 和 npm run lint:style 太麻烦了。 接下来,我们配置一下 vite 的插件,让 vite 在启动的过程中实时监视代码的变动。
搭配 vite 插件
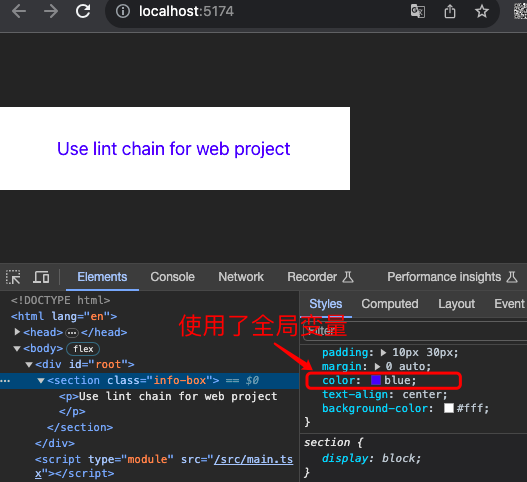
在配置 stylelint 和 eslint的 vite插件前,我们先让项目支持 sass 的全局的变量,比如我们把主题色提取到公共文件 style/variable.scss 中去。
$theme-color: blue;$theme-color: blue;在模块 info.scss 中引入这个变量:
// theme color
color: $theme-color;
// theme color
color: $theme-color;要保证模块中的 info.scss 能访问到全局的样式(variable.scss)变量,需要修改 vite的配置:
// 全局样式变量的路径
const styleGlobalVariable = path.resolve('./src/style/variable.scss');
export default defineConfig({
plugins: [react()],
// 增加下面的配置,让vite 解析 模块样式的时候,自动导入全局的样式变量
css: {
preprocessorOptions: {
scss: {
additionalData: `@import "${styleGlobalVariable}";`
}
}
}
});// 全局样式变量的路径
const styleGlobalVariable = path.resolve('./src/style/variable.scss');
export default defineConfig({
plugins: [react()],
// 增加下面的配置,让vite 解析 模块样式的时候,自动导入全局的样式变量
css: {
preprocessorOptions: {
scss: {
additionalData: `@import "${styleGlobalVariable}";`
}
}
}
});这样就能支持模块中的样式引用一些全局的样式变量,这在实际的开发中也比较有用,比如实现主题的切换功能。
接下来我们配置针对 eslint 和 stylelint 的 vite插件
vite-plugin-eslint
安装插件库:
npm install vite-plugin-eslint --save-devnpm install vite-plugin-eslint --save-dev修改 vite 的配置文件(vite.config.ts):
import viteEslint from 'vite-plugin-eslint';
// ......
export default defineConfig({
plugins: [
react(),
viteEslint(})
],
// ......
});import viteEslint from 'vite-plugin-eslint';
// ......
export default defineConfig({
plugins: [
react(),
viteEslint(})
],
// ......
});vite-plugin-eslint 插件支持传入各种参数。我在info.tsx增加一点无用代码
const a="lint-chain..."; // 1. 应该用单引号,2. 等号之间应该有空格 3. 变量 a 未被使用
const Info = () => {
return (
<section className="info-box">
<p>Use lint chain for web project</p>
</section>
);
};
export default Info; // 4. 下面应该有空行const a="lint-chain..."; // 1. 应该用单引号,2. 等号之间应该有空格 3. 变量 a 未被使用
const Info = () => {
return (
<section className="info-box">
<p>Use lint chain for web project</p>
</section>
);
};
export default Info; // 4. 下面应该有空行这时浏览器中,就会出现如下的四个报错,说明 vite 开发服务器已经集成进来 eslint 了。 每当文件有变动的时候,vite 都会 通过 vite-plugin-eslint 插件来调用 eslint 做代码风格和语法的校验。
我们给 vite-plugin-eslint 传入自动修复参数:
// .......
export default defineConfig({
plugins: [
react(),
viteEslint({
fix: true
}),
],
// ......
});// .......
export default defineConfig({
plugins: [
react(),
viteEslint({
fix: true
}),
],
// ......
});此时,代码会被自动修复,改成下面的样子:
import './info.scss';
const a = 'lint-chain...';
const Info = () => {
return (
<section className="info-box">
<p>Use lint chain for web project</p>
</section>
);
};
export default Info;import './info.scss';
const a = 'lint-chain...';
const Info = () => {
return (
<section className="info-box">
<p>Use lint chain for web project</p>
</section>
);
};
export default Info;- 变量 a 的值改成了 单引号包裹
- 变量 a 声明的时候 = 号两旁增加了空格
- 文件最后面插入了换行
修复了三个问题,只剩下变量未使用的错误了。
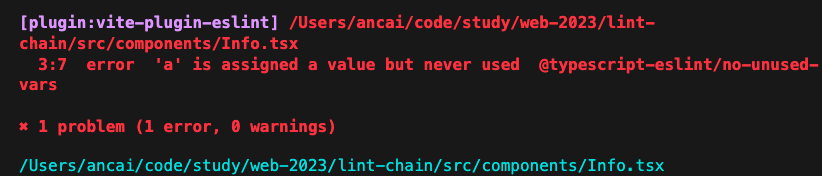
这是需要我们手动修复的问题了,只要将无用的变量 a 的定义删除即可。
以上,就是如何使用 vite-plugin-eslint 来帮助我们在项目中搭配 vite 使用的步骤了。
vite-plugin-stylelint
配置 vite-plugin-stylelint 的过程 和 上面配置 vite-plugin-eslint 类似。
- 安装 vite-plugin-stylelint 依赖库
npm install -D vite-plugin-stylelintnpm install -D vite-plugin-stylelint- 在 vite 的配置文件中引入插件:
import viteStyleLint from 'vite-plugin-stylelint';
export default defineConfig({
// ......
plugins: [
react(),
viteEslint({
fix: true
}),
viteStyleLint()
],
})import viteStyleLint from 'vite-plugin-stylelint';
export default defineConfig({
// ......
plugins: [
react(),
viteEslint({
fix: true
}),
viteStyleLint()
],
})经过上面的两步,就基本配置好了。我改一下 info.scss 模块中的 CSS 代码,验证一下效果:
// 不符合规范的样式代码
.info-box {
background-color: #fff;
width: 100%;
padding: 10px 30px 10px 30px;
margin: 0 auto;
// theme color
color: $theme-color;
text-align: center;
p{
font-size: 18px;
}
}// 不符合规范的样式代码
.info-box {
background-color: #fff;
width: 100%;
padding: 10px 30px 10px 30px;
margin: 0 auto;
// theme color
color: $theme-color;
text-align: center;
p{
font-size: 18px;
}
}改完后,发现浏览器的页面中会出现下面关于 style 样式问题:
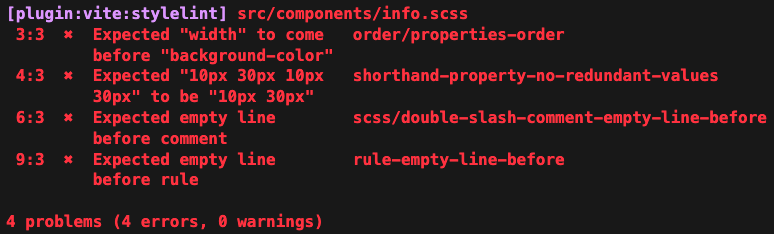
我们启用自动修复功能,传入插件的配置参数:
// vite.config.ts
export default defineConfig({
  plugins: [
    react(),
    viteEslint({
      fix: true
    }),
    viteStyleLint({
      // enable auto fix style problem
      fix: true,
    })
  ],
});
// vite.config.ts
export default defineConfig({
plugins: [
react(),
viteEslint({
fix: true
}),
viteStyleLint({
// enable auto fix style problem
fix: true,
})
],
});修改后,查看页面自动刷新,并且源码中样式也改变了。
// 自动修复成了 下面符合规范的样式代码
.info-box {
  width: 100%;
  padding: 10px 30px;
  margin: 0 auto;

  // theme color
  color: $theme-color;
  text-align: center;
  background-color: #fff;

  p{
    font-size: 18px;
  }
}
// 自动修复成了 下面符合规范的样式代码
.info-box {
width: 100%;
padding: 10px 30px;
margin: 0 auto;
// theme color
color: $theme-color;
text-align: center;
background-color: #fff;
p{
font-size: 18px;
}
}页面又能正常展示出来了。
经过以上的步骤,我们将 vite 和 eslint、stylelint 集成,在开发的过程中能实时发现不符合规范的地方,自动修复问题,保证了风格的统一。
开启编辑器的插件
除了配置 vite 插件外,我们平时做项目开发一般都使用 VS-code 编辑器,这里我们可以配置一下 编辑器中的 eslint 插件 和 prettier 插件,并设置 on save action,这样只有保存了代码,就能立刻校验代码的风格问题,实时性会更好。
vs-code 的 eslint 插件 
vs-code 的 prettier 插件 
然后,再设置一下 vscode 的选项,勾选 Editor: format on save 选项

这样,开发体验会更好,能实时检测代码语法和风格问题。
增加 git-hooks
经过上面的配置,我们能确保本地开发环境下的代码质量没有问题,符合团队的规范。 但是不能保证,提交到线上仓库的代码没有问题,有可能存在绕过 lint 校验提交到远程仓库的可能。 这时候,我们就需要借助于git hooks了。
什么是git hooks
简单理解就是,git工具暴露的一些接口,在特定的时期(时间发生时)来调用这些接口。 一般是在某些事件发生的时候触发,比如 git commit 之前触发 pre-commit 这个git hook。 在 git 内部定义了很多这样的 hook (钩子),我们可以充分利用它们,添加自定义的 git hook。
随便打开一个 git 仓库的根目录,找到隐藏的文件夹 .git:
cd .git/hooks
ls -lah
cd .git/hooks
ls -lah会发现里面,就展示了很多的 hooks 样例文件

我们可以修改其中的一个文件,将 pre-commit.sample => pre-commit。 然后,写入一个简单的 sh 输出语句:
# pre-commit
echo 'test git pre-commit hook'
# pre-commit
echo 'test git pre-commit hook'我们提交一下代码,会发现控制台打印出下面的语句:
test git pre-commit hooktest git pre-commit hook
假如,你在测试的时候发现,报下面的错误❌
hint: The '.git/hooks/pre-commit' hook was ignored because it's not set as executable.
hint: You can disable this warning with `git config advice.ignoredHook false`.
hint: The '.git/hooks/pre-commit' hook was ignored because it's not set as executable.
hint: You can disable this warning with `git config advice.ignoredHook false`.
说明所在目录的 pre-commit 文件没有执行权限,使用 chmod 命令修改一下即可
# 为 pre-commit 增加 执行权限
chmod +x ./pre-commit
# 为 pre-commit 增加 执行权限
chmod +x ./pre-commit通过上面的操作,我们发现手动修改 git hook的方式比较麻烦,这时候我们引入一个业界的开源库:husky。 它能帮助我们简化对 git hook的操作。
husky
- 添加依赖库
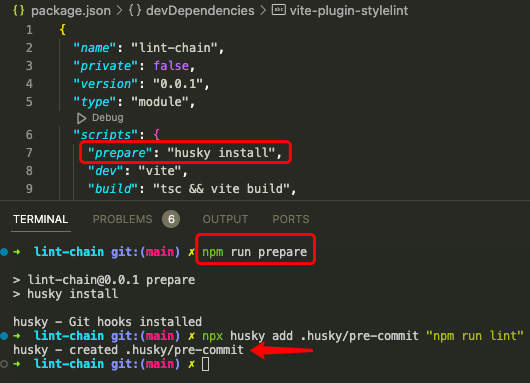
npm install husky --save-devnpm install husky --save-dev- 修改 package.json 文件,增加prepare 项
npm pkg set scripts.prepare="husky install"
# 记得运行一下下面这句,将 husky 这个库 挂载到shell的运行环境中
npm run prepare
npm pkg set scripts.prepare="husky install"
# 记得运行一下下面这句,将 husky 这个库 挂载到shell的运行环境中
npm run prepare- 增加git hook
npx husky add .husky/pre-commit "npm run lint"npx husky add .husky/pre-commit "npm run lint"这样我们就创建好了一个 pre-commit hook,在每次提交代码前,进行格式的校验,有问题就无法提交上去。
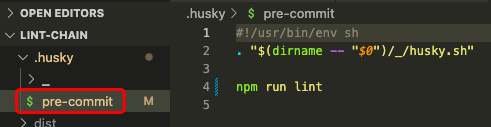
这时创建好 hook 后,项目的根目录会增加一些文件,如下图所示,可以清晰地看到创建hook中所包含的 shell 命令。
我们提交一下代码,验证一下效果。
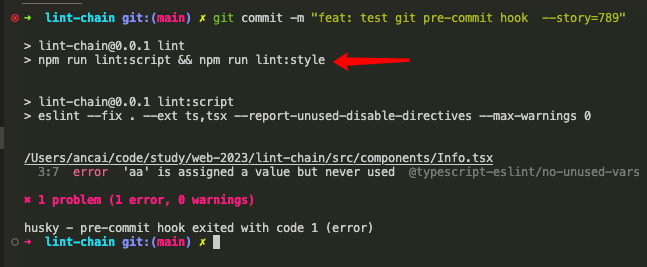
在代码提前前,会对所有的项目文件进行校验一遍,发现问题后,提交也无法通过。 必须改后,没有问题才能在 git 上提交成功
我们将 info.tsx 中的无用代码 const aa = 'unused variable'; 删除掉。
const aa = 'unused variable';
const Info = () => {
  return (
    <section className="info-box">
      <p>Use lint chain for web project</p>
    </section>
  );
};
export default Info;
const aa = 'unused variable';
const Info = () => {
return (
<section className="info-box">
<p>Use lint chain for web project</p>
</section>
);
};
export default Info;这时候就能正常提交成功了。 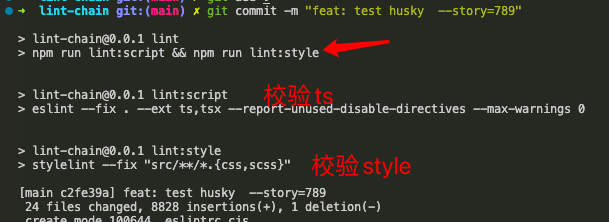
引入 lint-staged
上面我们借助 husky 来简化git-hooks的操作,并能够很容易实现提交前的代码校验。 但是,每次提交的时候,都对整个代码库的文件校验一遍,(尤其当项目代码量较大时)是很耗费时间的。 况且,很多项目都有历史包袱,之前的代码也无法保证都遵循当前的规范。 我们的初衷是,当前的团队成员提交的代码能够符合规范即可。
这时,我们需要借助另外一个工具库:lint-staged。它让我们每次提交代码的时候,只校验本次提交的内容,而忽略之前已经提交过的代码。 相当于是只做代码的增量校验。使用很简单:
- 安装 lint-staged 依赖库
npm install --save-dev lint-staged # requires further setupnpm install --save-dev lint-staged # requires further setup- 在 package.json 中增加如下配置,确定 由 lint-stage 来接管的文件列表
{
  "lint-staged": {
    "**/*.{js,jsx,tsx,ts,json}": [
      "npm run lint:script"
    ],
    "**/*.{css,scss}": [
      "npm run lint:style"
    ]
  }
}
{
"lint-staged": {
"**/*.{js,jsx,tsx,ts,json}": [
"npm run lint:script"
],
"**/*.{css,scss}": [
"npm run lint:style"
]
}
}- 在 Husky 中应用
lint-staged,打开.husky > pre-commit文件,将npm run lint替换成npx lint-staged即可
#!/usr/bin/env sh
. "$(dirname -- "$0")/_/husky.sh"

npx lint-staged
#!/usr/bin/env sh
. "$(dirname -- "$0")/_/husky.sh"
npx lint-staged我们测试一下效果:
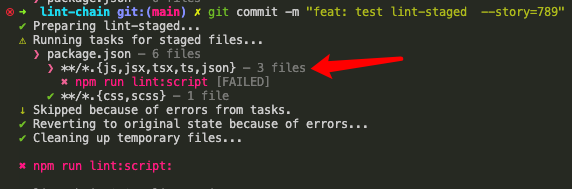
可以发现,校验只针对 git 暂存区中的文件进行校验了,并显示了匹配出的文件数量。 这样,以后代码提交前只会针对本次修改的内容做增量校验了。
对commit-msg的校验
如果开发团队中的成员,提交的git commit 信息随意填写,每次git commit -m "111 222" 这样的无效信息的话。 时间一久,倘若要追溯代码库中的某个bug,查看之前的提交信息。 那么一堆无用的提交信息,对于排查问题,没有任何的帮助。 也在一定程度上,减弱了使用代码版本库管理代码的作用和意义。
为了约束团队成员,让大家遵照统一的规范,来填写 commit 的提交记录信息。 业界也有相应的工具库,供我们使用。比如:commitlint
commitlint: Alias of @commitlint/cli 两者是同一个库
- 我们首先安装相应的依赖库:
npm install -D @commitlint/cli @commitlint/config-conventionalnpm install -D @commitlint/cli @commitlint/config-conventional其中:
- @commitlint/cli : 负责执行提交时的交互命令
- @commitlint/config-conventional : 业界约定的一些提交信息规范,相当于 eslint 中的
eslint:recommended规则规范
- 在项目根目录 新增 commitlint 的配置文件,继承社区的通用约定规则,设置合法的提交类型有哪些。
{
  "extends": ["@commitlint/config-conventional"],
  "rules": {
    "type-enum": [2, "always", [
      "feat", "fix", "docs", "style", "refactor", "perf", "test", "build", "ci", "chore", "revert"
    ]],
    "subject-case": [0]
  }
}
{
"extends": ["@commitlint/config-conventional"],
"rules": {
"type-enum": [2, "always", [
"feat", "fix", "docs", "style", "refactor", "perf", "test", "build", "ci", "chore", "revert"
]],
"subject-case": [0]
}
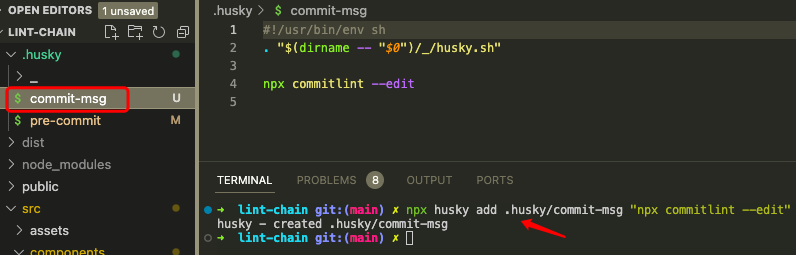
}- 整合进 husky 中,增加一个 commit-msg的 hook
npx husky add .husky/commit-msg "npx commitlint --edit"npx husky add .husky/commit-msg "npx commitlint --edit"这样我们就将 commit-msg hook 添加好了,以后每次提交git日志的时候,就会触发日志信息的校验。
说了这么多,那什么样的git提交日志,才是符合规范的呢,规范是啥?
社区约定是这样的:
<type>(<scope>): <subject> // 必须

                <body> // 可选

                <footer> // 可选
<type>(<scope>): <subject> // 必须
<body> // 可选
<footer> // 可选- type: 提交类别(下面基本会覆盖提交代码所需,建议只出现下面的类别,多了会更乱)
- init:初始化
- feat:新功能(feature)
- fix:修补bug
- docs:文档(documentation)
- style: 格式(不影响代码运行的变动)
- refactor:重构(即不是新增功能,也不是修改bug的代码变动)
- test:增加测试
- chore:构建过程或辅助工具的变动
- scope:影响范围(可不写)
- subject:对改变的正常描述,最好以动词开头语(尽量详细,必填)
- body:详细描述
- footer:修改不兼容变动以及关闭Issue时
遵照上符合上面的规则填写git日志,就符合规范了。 我们做一下测试,随意填写一个 git 日志,控制台给出了提醒,说明日志填写不合规。
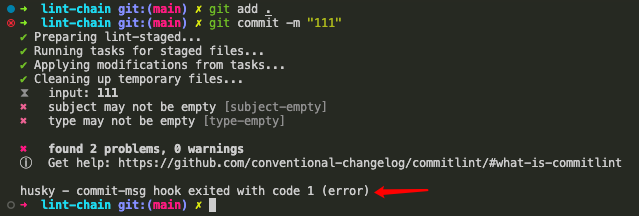
- type 字段不能为空
- 主题 不能为空
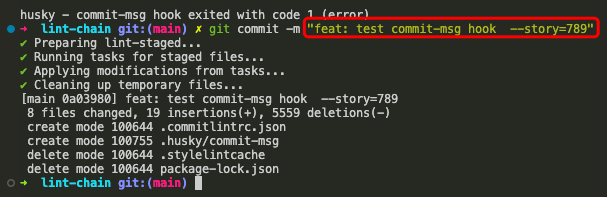
我们修改一下提交日志,按照上面的约定,填写日志信息,如下图所示,就能成功提交了。
总结
本文详细梳理了如何使用 lint 工具链应用在 vite 脚手架创建的工程上。 通过安装相应的工具库,合理的配置,就能让每个开发环节符合规范,保证团队的代码产出质量。